 LG 洗衣机WD-6003C 说明书
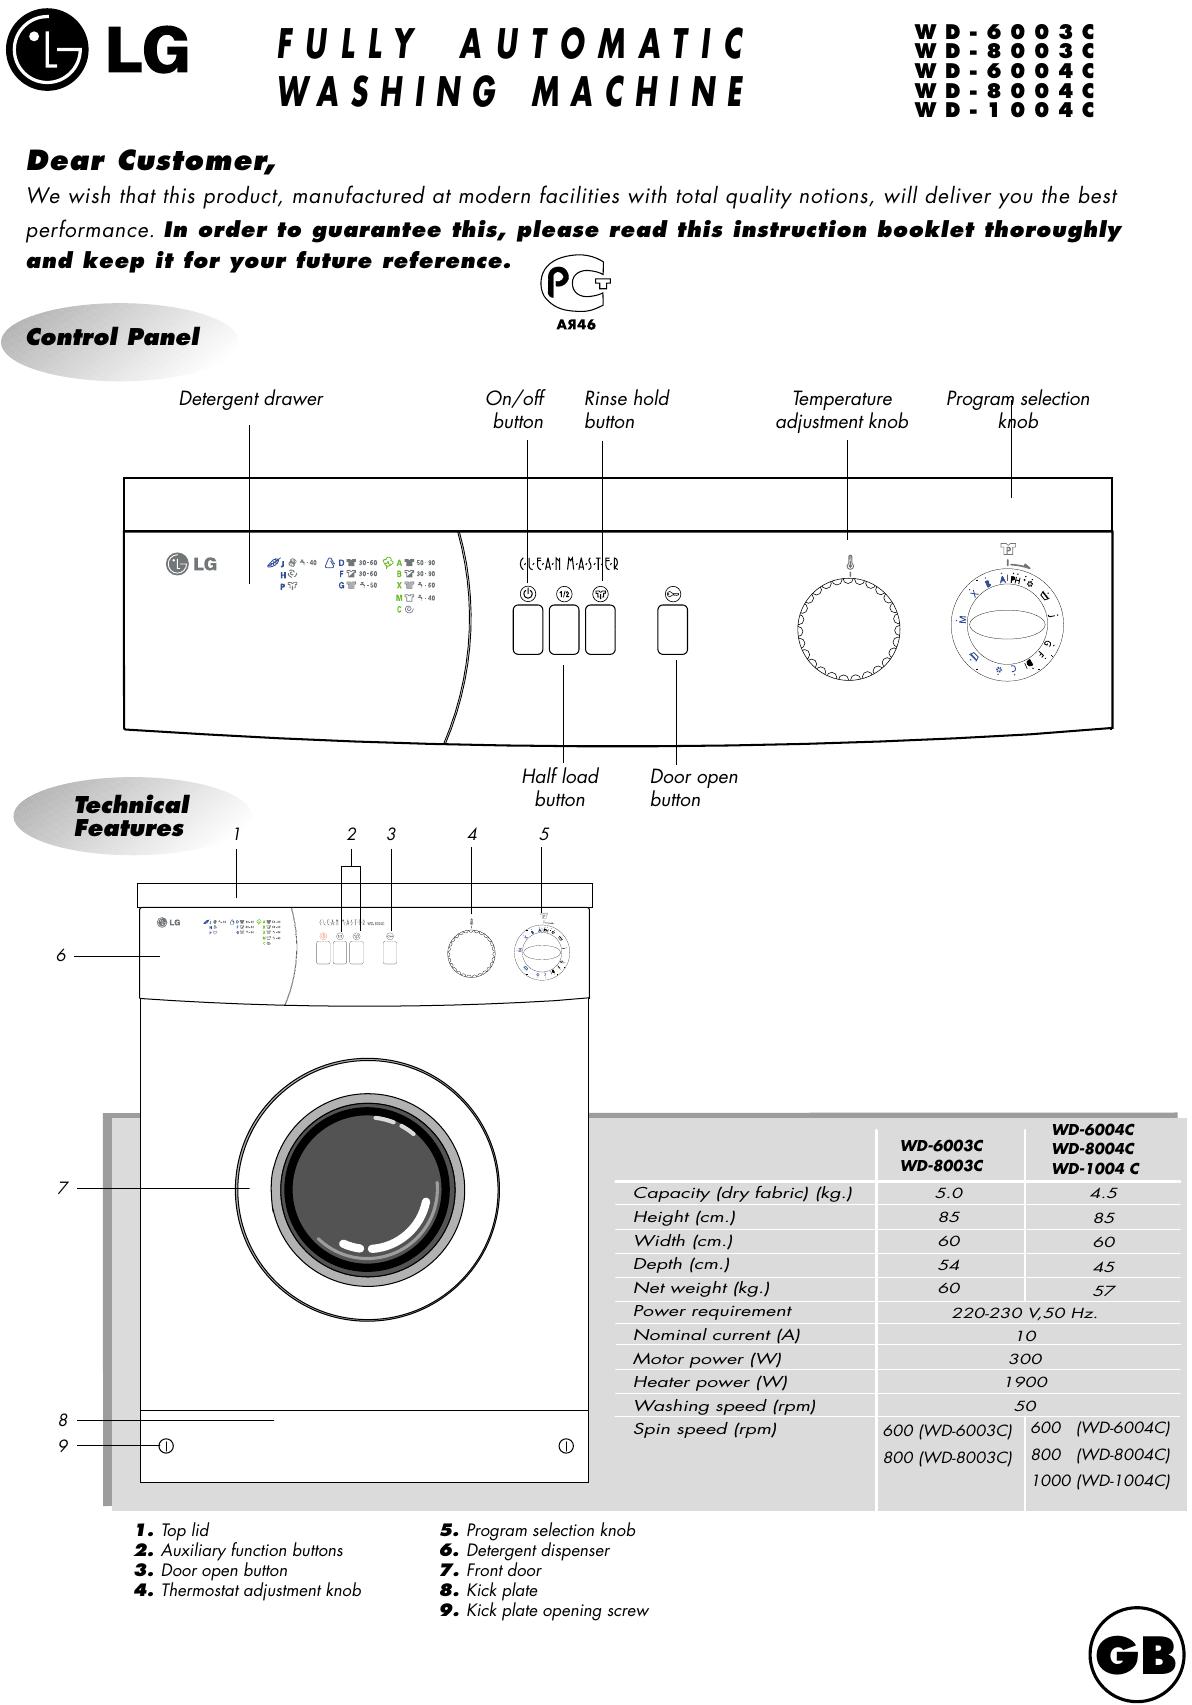
LG 洗衣机WD-6003C 说明书
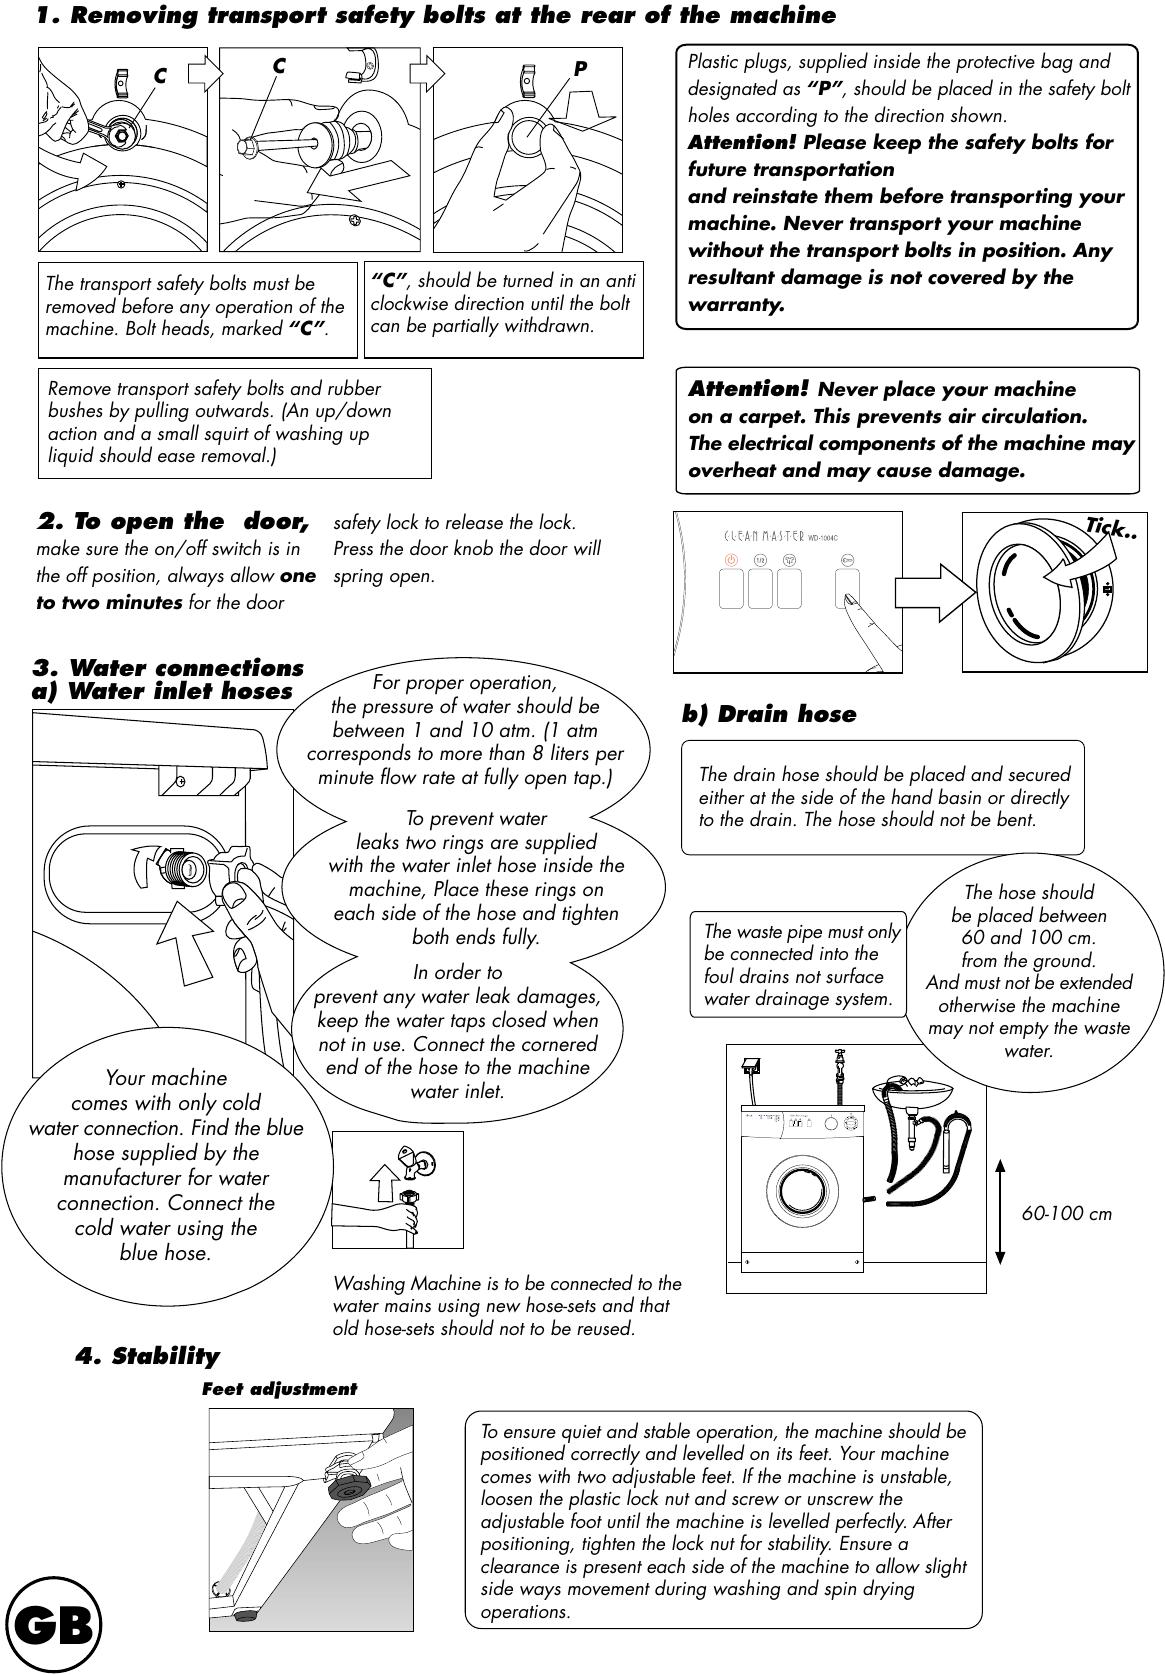
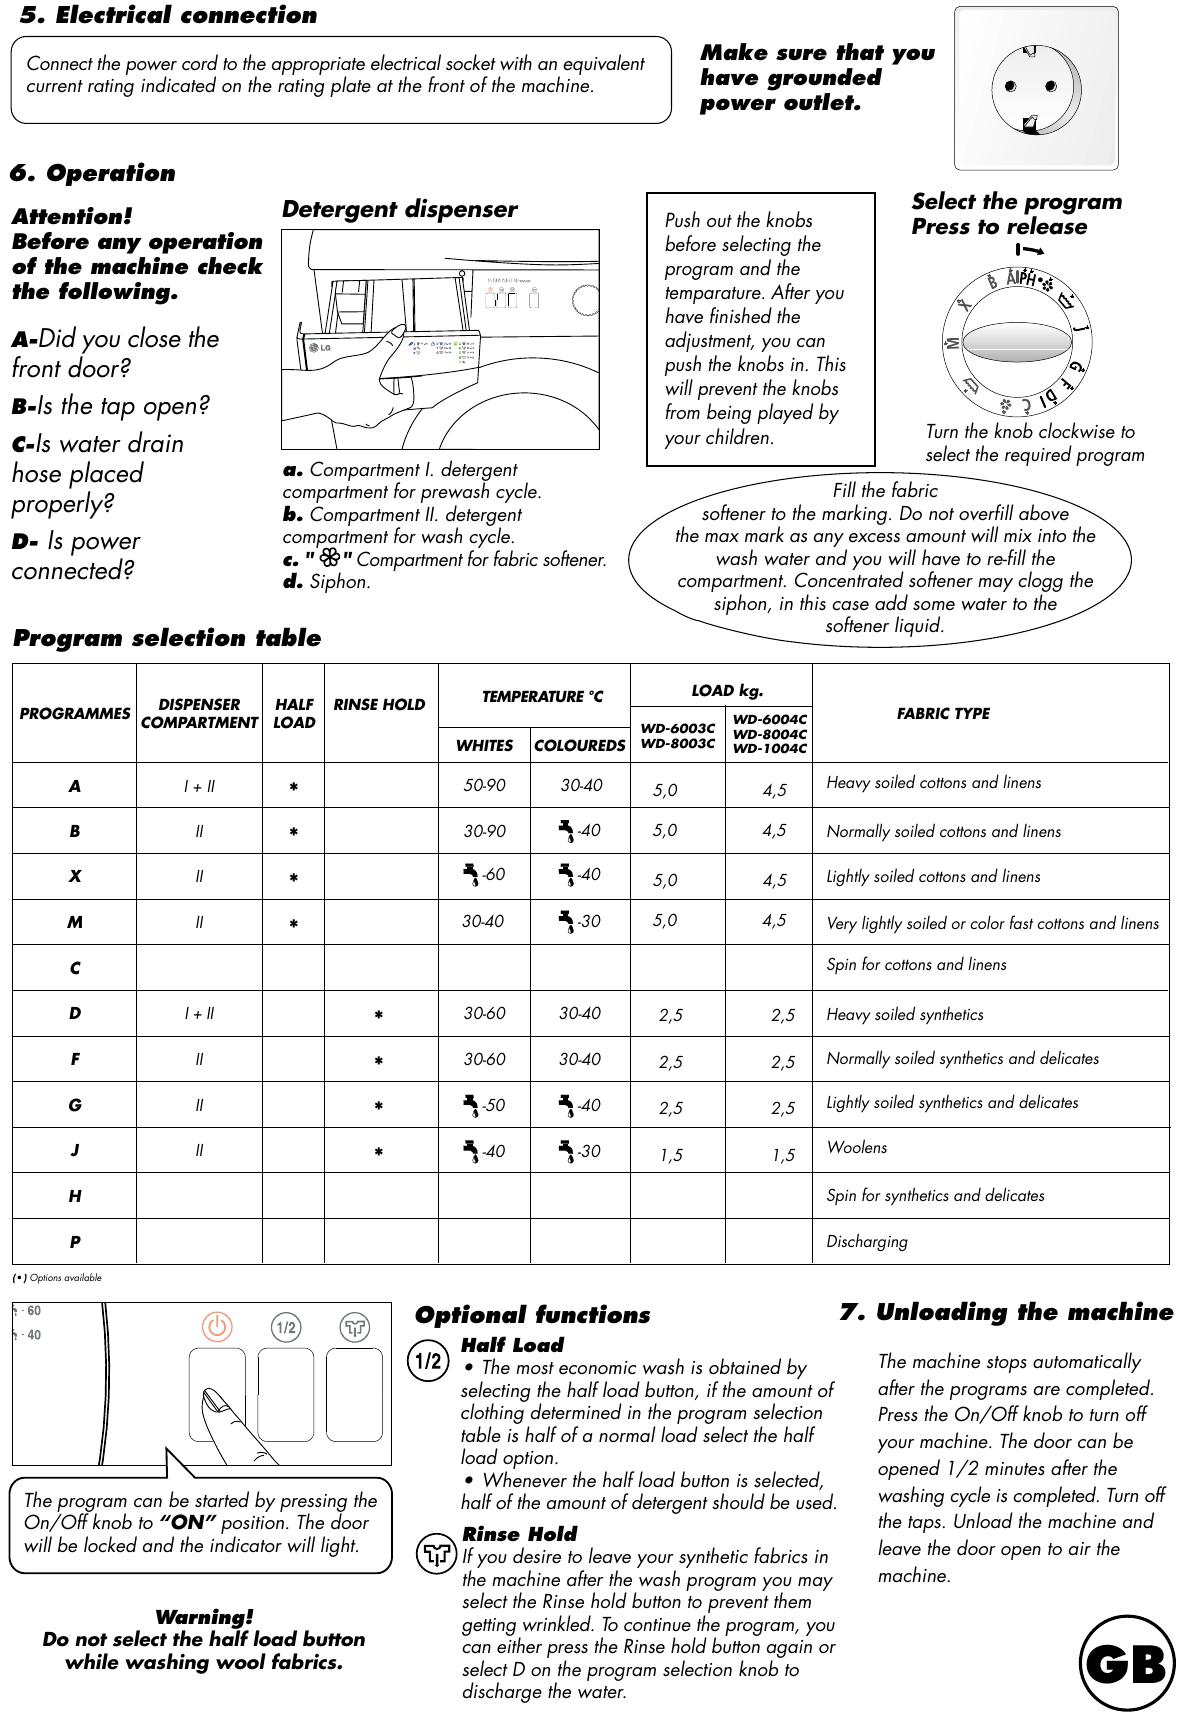
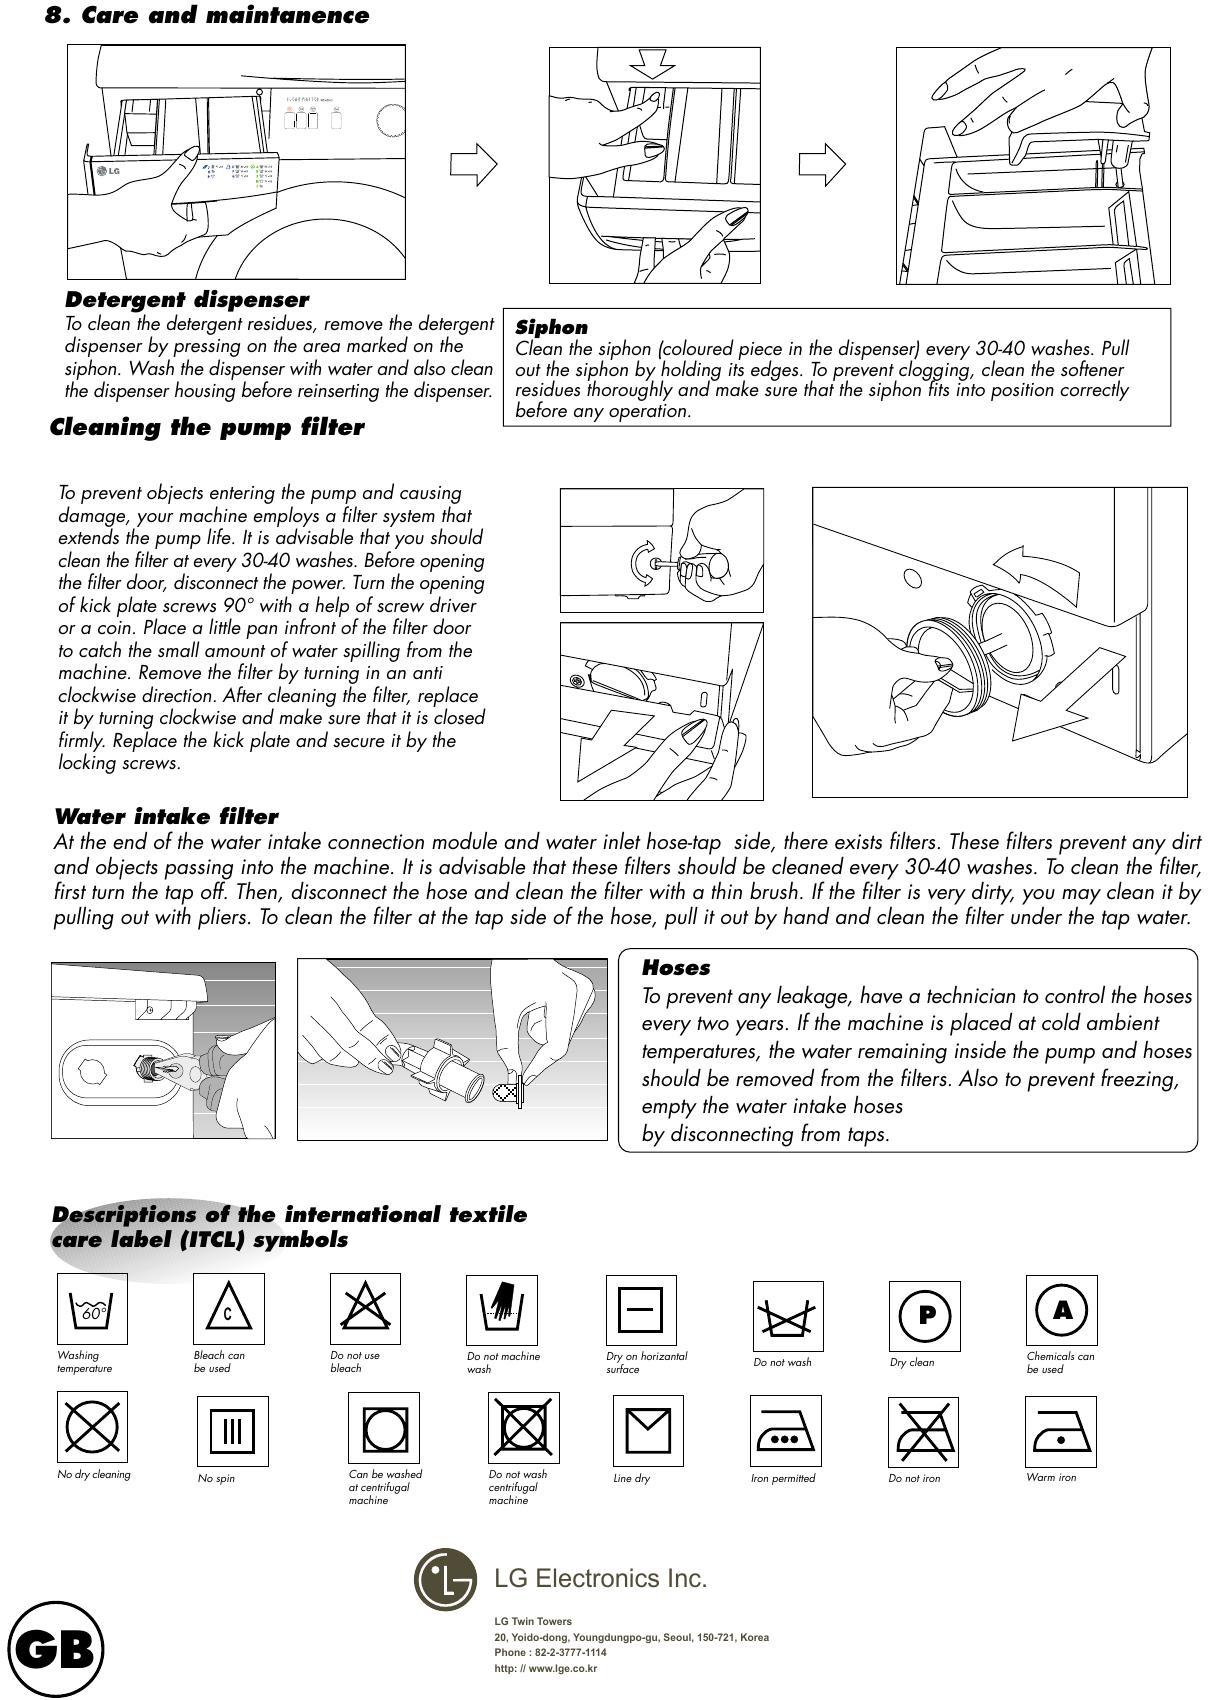
W W W W W FULLY AUTOMATIC WASHING MACHINE D D D D D - 6 8 6 8 1 0 0 0 0 0 0 0 0 0 0 3 3 4 4 4 C C C C C Dear Customer, We wish that this product, manufactured at modern facilities with total quality notions, will deliver you the best performance. In order to guarantee this, please read this instruction booklet thoroughly and keep it for your future reference. Control Panel Detergent drawer Technical Features On/off button Rinse hold button Half load button 1 2 3 4 Temperature adjustment knob Program selection knob Door open button 5 6 WD-6004C WD-8004C WD-1004 C WD-6003C WD-8003C 7 Capacity (dry fabric) (kg.) 5.0 4.5 Height (cm.) 85 85 Width (cm.) 60 60 Depth (cm.) 54 45 Net weight (kg.) 60 57 Power requirement 220-230 V,50 Hz. Nominal current (A) 10 Motor power (W) 300 Heater power (W) 1900 Washing speed (rpm) 8 Spin speed (rpm) 9 50 600 (WD-6003C) 600 (WD-6004C) 800 (WD-8003C) 800 (WD-8004C) 1000 (WD-1004C) 1. 2. 3. 4. Top lid Auxiliary function buttons Door open button Thermostat adjustment knob 5. 6. 7. 8. 9. Program selection knob Detergent dispenser Front door Kick plate Kick plate opening screw GB 1. Removing transport safety bolts at the rear of the machine C C Plastic plugs, supplied inside the protective bag and designated as “P”, should be placed in the safety bolt holes according to the direction shown. Attention! Please keep the safety bolts for future transportation and reinstate them before transporting your machine. Never transport your machine without the transport bolts in position. Any resultant damage is not covered by the warranty. P The transport safety bolts must be removed before any operation of the machine. Bolt heads, marked “C”. “C”, should be turned in an anti clockwise direction until the bolt can be partially withdrawn. Attention! Never place your machine on a carpet. This prevents air circulation. The electrical components of the machine may overheat and may cause damage. Remove transport safety bolts and rubber bushes by pulling outwards. (An up/down action and a small squirt of washing up liquid should ease removal.) 2. To open the door, safety lock to release the lock. make sure the on/off switch is in Press the door knob the door will the off position, always allow one spring open. to two minutes for the door 3. Water connections a) Water inlet hoses For proper operation, the pressure of water should be between 1 and 10 atm. (1 atm corresponds to more than 8 liters per minute flow rate at fully open tap.) Tick.. b) Drain hose To prevent water leaks two rings are supplied with the water inlet hose inside the machine, Place these rings on each side of the hose and tighten both ends fully. Your machine comes with only cold water connection. Find the blue hose supplied by the manufacturer for water connection. Connect the cold water using the blue hose. In order to prevent any water leak damages, keep the water taps closed when not in use. Connect the cornered end of the hose to the machine water inlet. The drain hose should be placed and secured either at the side of the hand basin or directly to the drain. The hose should not be bent. The waste pipe must only be connected into the foul drains not surface water drainage system. The hose should be placed between 60 and 100 cm. from the ground. And must not be extended otherwise the machine may not empty the waste water. 60-100 cm Washing Machine is to be connected to the water mains using new hose-sets and that old hose-sets should not to be reused. 4. Stability Feet adjustment GB To ensure quiet and stable operation, the machine should be positioned correctly and levelled on its feet. Your machine comes with two adjustable feet. If the machine is unstable, loosen the plastic lock nut and screw or unscrew the adjustable foot until the machine is levelled perfectly. After positioning, tighten the lock nut for stability. Ensure a clearance is present each side of the machine to allow slight side ways movement during washing and spin drying operations. 5. Electrical connection Make sure that you have grounded power outlet. Connect the power cord to the appropriate electrical socket with an equivalent current rating indicated on the rating plate at the front of the machine. 6. Operation Detergent dispenser Attention! Before any operation of the machine check the following. you close the front door? B-Is the tap open? C-Is water drain hose placed properly? D- Is power connected? A-Did a. Compartment I. detergent compartment for prewash cycle. b. Compartment II. detergent compartment for wash cycle. c. " " Compartment for fabric softener. d. Siphon. DISPENSER COMPARTMENT HALF LOAD RINSE HOLD LOAD kg. TEMPERATURE °C WHITES COLOUREDS Turn the knob clockwise to select the required program Fill the fabric softener to the marking. Do not overfill above the max mark as any excess amount will mix into the wash water and you will have to re-fill the compartment. Concentrated softener may clogg the siphon, in this case add some water to the softener liquid. Program selection table PROGRAMMES Select the program Press to release Push out the knobs before selecting the program and the temparature. After you have finished the adjustment, you can push the knobs in. This will prevent the knobs from being played by your children. WD-6003C WD-8003C FABRIC TYPE WD-6004C WD-8004C WD-1004C A I + II * 50-90 30-40 5,0 4,5 Heavy soiled cottons and linens B II * 30-90 -40 5,0 4,5 Normally soiled cottons and linens X II * -60 -40 5,0 4,5 Lightly soiled cottons and linens M II * 30-40 -30 5,0 4,5 Very lightly soiled or color fast cottons and linens Spin for cottons and linens C D I + II * 30-60 30-40 2,5 2,5 Heavy soiled synthetics F II * 30-60 30-40 2,5 2,5 Normally soiled synthetics and delicates G II * -50 -40 2,5 2,5 Lightly soiled synthetics and delicates J II * -40 -30 1,5 1,5 Woolens H Spin for synthetics and delicates P Discharging (•) Options available Optional functions The program can be started by pressing the On/Off knob to “ON” position. The door will be locked and the indicator will light. Warning! Do not select the half load button while washing wool fabrics. 7. Unloading the machine Half Load • The most economic wash is obtained by selecting the half load button, if the amount of clothing determined in the program selection table is half of a normal load select the half load option. • Whenever the half load button is selected, half of the amount of detergent should be used. Rinse Hold If you desire to leave your synthetic fabrics in the machine after the wash program you may select the Rinse hold button to prevent them getting wrinkled. To continue the program, you can either press the Rinse hold button again or select D on the program selection knob to discharge the water. The machine stops automatically after the programs are completed. Press the On/Off knob to turn off your machine. The door can be opened 1/2 minutes after the washing cycle is completed. Turn off the taps. Unload the machine and leave the door open to air the machine. GB 8. Care and maintanence Detergent dispenser To clean the detergent residues, remove the detergent dispenser by pressing on the area marked on the siphon. Wash the dispenser with water and also clean the dispenser housing before reinserting the dispenser. Cleaning the pump filter Siphon Clean the siphon (coloured piece in the dispenser) every 30-40 washes. Pull out the siphon by holding its edges. To prevent clogging, clean the softener residues thoroughly and make sure that the siphon fits into position correctly before any operation. To prevent objects entering the pump and causing damage, your machine employs a filter system that extends the pump life. It is advisable that you should clean the filter at every 30-40 washes. Before opening the filter door, disconnect the power. Turn the opening of kick plate screws 90° with a help of screw driver or a coin. Place a little pan infront of the filter door to catch the small amount of water spilling from the machine. Remove the filter by turning in an anti clockwise direction. After cleaning the filter, replace it by turning clockwise and make sure that it is closed firmly. Replace the kick plate and secure it by the locking screws. Water intake filter At the end of the water intake connection module and water inlet hose-tap side, there exists filters. These filters prevent any dirt and objects passing into the machine. It is advisable that these filters should be cleaned every 30-40 washes. To clean the filter, first turn the tap off. Then, disconnect the hose and clean the filter with a thin brush. If the filter is very dirty, you may clean it by pulling out with pliers. To clean the filter at the tap side of the hose, pull it out by hand and clean the filter under the tap water. Hoses To prevent any leakage, have a technician to control the hoses every two years. If the machine is placed at cold ambient temperatures, the water remaining inside the pump and hoses should be removed from the filters. Also to prevent freezing, empty the water intake hoses by disconnecting from taps. Descriptions of the international textile care label (ITCL) symbols 60° Washing temperature No dry cleaning P C Bleach can be used No spin Do not use bleach Can be washed at centrifugal machine Do not machine wash Do not wash centrifugal machine Dry on horizantal surface Line dry Do not wash Dry clean Chemicals can be used Iron permitted Do not iron Warm iron LG Electronics Inc. GB A LG Twin Towers 20, Yoido-dong, Youngdungpo-gu, Seoul, 150-721, Korea Phone : 82-2-3777-1114 http: // www.lge.co.kr