 蓝牙耳机HS820.pdf
蓝牙耳机HS820.pdf
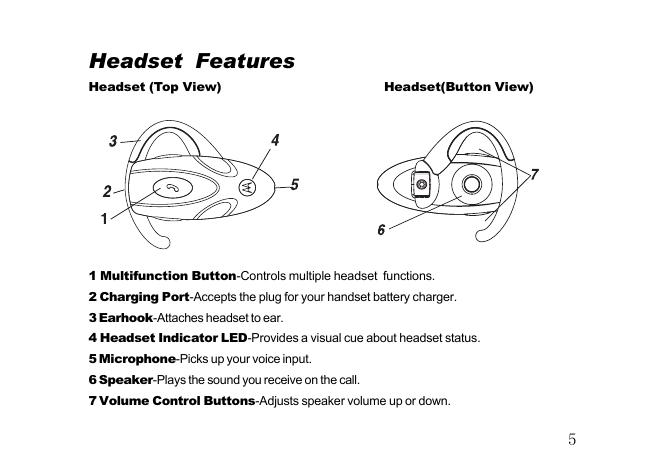
Safety and General Information IMPORTANT INFORMATION ON SAFE AND EFFICIENT OPERATION. READ THIS INFORMATION BEFORE USING YOUR DEVICE. Users are not permitted to make changes or modify the device in any way. Changes or modifications not expressly approved by the party responsible for compliance could void the user’s authority to operate the equipment. See 47 CFR Sec. 15.21. This device complies with part 15 of the FCC Rules. Operation is subject to the following two conditions: (1) This device may not cause harmful interference, and (2) this device must accept any interference received, including interference that may cause undesired operation. See 47 CFR Sec. 15.19(3). Electromagnetic Interference/Compatibility Note: Nearly every electronic device is susceptible to electromagnetic interference (EMI) if inadequately shielded, designed, or otherwise configured for electromagnetic compatibility. Facilities To avoid electromagnetic interference and/or compatibility conflicts, turn off your device in any facility where posted notices instruct you to do so. Hospitals or health care facilities 1 may be using equipment that is sensitive to external RF energy. Aircraft When instructed to do so, turn off your device when on board an aircraft. Any use of a device must be in accordance with applicable regulations per airline crew instructions. Medical Devices Hearing Aids Some devices may interfere with some hearing aids. In the event of such interference, you may want to consult with your hearing aid manufacturer to discuss alternatives. Other Medical Devices If you use any other personal medical device, consult the manufacturer of your device to determine if it is adequately shielded from RF energy. Your physician may be able to assist you in obtaining this information. 2 Industry Canada Notice to Users Operation is subject to the following two conditions: (1) This device may not cause interference and (2) This device must accept any interference, including interference that may cause undesired operation of the device Ref IC RSS 210 Sec. 5.11. The term “IC:” before the certification/ registration number only signifies that registration was performed based on a Declaration of Conformity indicating that Industry Canada technical specifications were met. It does not imply that Industry Canada approved the equipment. See Ref IC Self-Marking 6(f) and RSP-100 Sec. 4. FCC Notice to Users This equipment has been tested and found to comply with the limits for a Class B digital device, pursuant to part 15 of the FCC Rules. These limits are designed to provide reasonable protection against harmful interference in a residential installation. This equipment generates, uses and can radiate radio frequency energy and, if not installed and used in accordance with the instructions, may cause harmful interference to radio communications. However, there is no guarantee that interference will not occur in a particular installation. If this equipment does cause harmful interference to radio or television reception, which can be determined by turning the equipment off and on, the user is encouraged to try to correct the interference by one or more of the following measures: * Reorient or relocate the receiving antenna. * Increase the separation between the equipment and the receiver. * Connect the equipment to an outlet on a circuit different from that to which the receiver is connected. * Consult the dealer or an experienced radio/TV technician for help. 3 Introduction What Is Bluetooth Wireless Technology? Bluetooth devices communicate without wires, using built-in radio transceivers that operate on a globally available radio frequency to ensure worldwide compatibility. Your Bluetooth Wireless Headset can communicate with other Bluetooth devices within a range of approximately 10 meters (33 feet). How Can I Use My Wireless Headset? Your Wireless Headset, with Bluetooth technology, lets you connect with other similarly equipped devices such as a Motorola V600 with integrated Bluetooth technology. * Use your phone hands free. * Handle incoming and outgoing calls with the headset multifunction control button (MFB). * Use voice activation to make calls. Note: The HS820 supports both Headset and Hands Free Bluetooth Profiles for increased functionality and compatibility with more products. Consult your user’s guide for more information. 4 Headset Features Headset (Top View) Headset(Button View) 1 Multifunction Button-Controls multiple headset functions. 2 Charging Port-Accepts the plug for your handset battery charger. 3 Earhook-Attaches headset to ear. 4 Headset Indicator LED-Provides a visual cue about headset status. 5 Microphone-Picks up your voice input. 6 Speaker-Plays the sound you receive on the call. 7 Volume Control Buttons-Adjusts speaker volume up or down. 5 Using Your Headset Charging Your Headset Battery When to Charge First-Time Use-Before you can use your headset, charge its self-contained battery for two hours. Recharging-When you hear five rapid high tones through the headset speaker, repeated at 20-second intervals, the headset battery needs recharging. Over extended periods of time, batteries gradually wear down and require longer charging times. This is normal. Additionally, your battery will have less standby time the more you talk on the phone with your headset. The rechargeable batteries that power your wireless headset must be disposed of properly and may need to be recycled. Contact your local recycling center for proper disposal methods. Warning: Never dispose of batteries in a fire because they may explode. 6 How to Charge Step 1 Plug the Motorola charger into the headset, with the charger’s release tab facing down and the headset facing up. 2 Plug the other end of the charger into an electrical outlet. During charging, the headset indicator turns on and remains on until charging completes. The headset will not work while charging. Your headset fully charges in approximately two hours . 3 When charging completes (indicator off), remove the charger from the electrical outlet, press the release tab, and detach the charger from the headset. Note: You can also use a Motorola Original Vehicle Power Adapter to charge the headset battery while in your vehicle. A fully charged headset battery provides approximately: * 6 hours talk time *100 hours standby time 7 Wearing Your Headset Placing the Headset on Your Ear When packaged, the headset is originally set up to wear on the right ear. To place the headset on your ear: Step 1 Open the earhook (45 from the headset). 2 Loop the earhook over your ear. 3 Press the headset to your ear. 4 Point the microphone toward your mouth. Changing for Wear on the Left Ear Step 1 8 Open the earhook (90 from the headset). Step 2 Gently lift and pull the top of the earhook up and off the upper hinge pin. Then pull it away to remove it. 3 Flip the headset over. 4 Hook the bottom of the earhook onto the lower hinge pin, then lift and pull the top of the earhook over the upper hinge pin. 5 To change the volume button orientation, see “Adjusting Headset Volume” on page 15. 9 Power On / Off Power On Action With headset off, press and hold Multifunction Button and any one of the Volume button for more than 3 seconds until the LED on with flashing rapidly. Power Off Action With headset on, press and hold Multifunction Button and any one of the volume button for more than 3 seconds until the LED off with flashing rapidly. 10 Pairing Your Headset and Phone Note: You must pair your headset and phone before you can make a call. “Pairing” creates a link between devices with Bluetooth wireless technology, and allows the phone to remember the headset’s unique ID. When your headset and phone are paired, your headset automatically connects to your phone. Pairing With the headset and phone close together: Action 1 With the headset off, hold the Multifunction Button until the LED remains on (about 3 seconds). 2 Perfor m a device discovery from the phone. For details on device discovery for your phone, refer to the phone’s user’s guide. When the scan is complete, the phone displays the devices found. 3 Select the Motorola HS820 from the discovered devices list and confirm following the on screen prompts. 4 When prompted by the phone, enter the passkey 0000 and confirm to pair the headset with the phone. The device ID is now stored in the phone’s memory. Pairing is successful when the headset indicator flashes rapidly. 11 Pairing to Additional Devices Your headset can store pairing information for up to eight different devices with Bluetooth wireless technology. Devices are stored in a “Paired Device List” in memory in the order entered. When an attempt to pair to more than eight devices is made, the oldest paired device is removed from the list. Any of the eight paired devices can initiate a connection to the headset. The headset will only automatically initiate a connection (upon power-up) with the last device it was connected to. If you want to connect the headset to another device in the paired device list, you must initiate the connection from that device. Whichever of the eight devices initiates a connection to the headset afterwards, that device then becomes the “last connected” device. Adjusting Headset Volume Increasing or Decreasing Volume To increase speaker volume, press the top volume button repeatedly until you reach the desired volume level. To decrease speaker volume, press the bottom volume button repeatedly until you reach the desired volume level. Volume Orientation Technology To change the volume button orientation for left or right ear: 12 Action With the headset off, press the Multifunction button and desired volume button to assign as "volume up" until the LED flashes 2 times and the headset powers up. Making and Receiving Calls Your headset supports both Handsfree and Headset Profiles. Accessing call functions depends on which profile your phone supports. Note: Some phones do not support all features listed. See your phone’s user’s guide. You can activate call functions for the Handsfree profile according to the following table: Function Device Status Action Phone Headset HandsfreeProfile Enter Pairing (Configura tion) Mode On Off Press & hold MFB until LED remains lit. Headset can be discovered by another Bluetooth device. Make a Voice Dial Call Redial a Number On in idle On Short press MFB, speak name, phone dials call On-voice dialing turnedon or off On-(Idle) Long press MFB 13 Device Status Action Function Phone Headset Handsfree Profile End a Call On-in call On Short press MFBE Put Active Call On Hold On-in call On Long press MFBE Receive a Call On-phone rings On Short press MFB(call is answered) Reject a Call On-phone rings On Long press MFB Answer 2nd Incoming call On-in call, 2nd call coming in On Long press MFB, places 1st call on hold, answers incoming call Toggle between Two Active Callsh On-in call, 2nd call on old On Long press MFBE Transfer Call From Phone to Headset On-in call On Short press MFB, (call transferred to headset) Note: If the link abnormally disconnects (for example, out of range) the headset tries to reestablish the link. 14 Using Your Headset Indicator LED With charger plugged in: Headset Indicator Status ON OFF charging in progress charging complete With no charger plugged in: Headset Indicator Status OFF ON 10 rapid flashes Flashes at a 3-second interval (.1 seconds ON 2.9 seconds OFF) Pulses at an 8-second interval (2.0 seconds ON, 6.0 seconds OFF) power off (steady) pairing mode pairing successful standby (not on a call) connected (on a call) Note: When the wireless headset is paired to the phone and there is no activity for 5 minutes, the blue flashing LED turns off. Any button press on the headset, resets the timer, and the 15 flashing resumes. Audio Tones Audio Tone Single high tone when pressing volume button Five rapid high tones, repeated every 20 seconds No audio indications; deteriorating audio quality Series of 4 tones, low high to Ring tone Single high tone Single low tone Dual high/low tone Single high tone Series of 4 tones, high to low 16 Fast high/low tone every 5 seconds (max. & min. volume confirm beep) No tone Headset Status volume maximum or minimum reached low battery out of range audio link open (Headset mode), active call (hands free mode) incoming call pairing confirmation initiate voice activation voice tag not recognized end call audio link closed (Headset mode), call ended (hands free mode) no network/service power ON/OFF 安全和性能 有关安全及有效使用的重要信息。请于使用设备前阅读。 用户不能对设备进行任何更改。任何未经许可的更改都可 能导致有损用户使用该设备的权利。参见 47CFR Sec.15. 21。 此设备符合联邦通讯委员会(FCC)标准第 15 部分。此设备 运作过程中必须符合以下 2 个条件: (1)此设备不能产生任 何有害干扰,同时(2)此设备必须能够接受可能干扰,包 括可能会导致非正常工作的干扰。参见 47CFR Sec.15.19 (3)。 电磁干扰与电磁兼容 注:几乎所有电子设备,如果不适当包装、设计或电磁兼容 配置,都极易产生电磁干扰。 17 在某些场所中 为避免电磁干扰或兼容冲突,请按该场所提示要求,关闭 您的电子设备。医院及健康机构使用的某些设备极易受到外 置射频的影响。 在飞机上 在登机后,请按要求关闭您的电子设备。任何电子设备的 使用均需符合机舱机组人员规定。 医疗设备 助听器 有些电子设备可能会对助听器产生干扰。当遇到此类干扰 时,请与您的助听器厂商取得联系选择替代产品。 其他医疗设备 18 如果您使用任何其他私人医疗设备,请与设备厂商联系, 以确认它的抗射频干扰性。您的私人医生或许能帮助您了解 相关信息。 加拿大行业协会声明 设备在使用中必须符合以下 2 个条件:(1 )此设备不能 产生任何有害干扰,同时(2)此设备必须能够接受干扰,包 括可能会导致非正常工作的干扰。参见 IC RSS 210 Sec. 5.11。 “IC”指设备取得认证号前,此设备的注册号是基于 符合加拿大行业技术标准规格的声明发放的。并不代表加拿 大行业协会认可该设备。参见 Ref IC Self - Making 6 (f) and RSP-100 Sec.4. 联邦通讯委员会声明 此设备经过测试,符合 B 级数字设备标准,符合联邦通讯委 员会第 15 部分的规定。这些限制标准为确保此设备在居住 地区使用防止有害干扰。此设备使用并放射无线电频率,如 不按照标准正常安装使用,可能会对无线电通讯造成有害干 扰。然而,无法保证采用何种安装模式可以完全避免干扰。 19 如果该设备对无线电或电视接收造成有害干扰,导致必须 开启或关闭该设备,用户可以尝试以下几种方法避免干扰: * 调整接收天线 * 将此设备远离其他信号接收设备 * 将该设备与其他信号接收设备分置在不同电源上 * 与供应商取得联系,或向资深广播电视技术人员咨询 20 简介 什么是无线蓝牙技术? 蓝牙技术是指在无线的情况下、利用内置无线电收发设备 进行沟通;此内置无线电收发设备为保证全球兼容性,可 接收全球的无线电频率。此款无线蓝牙耳机可在约 1 0 米 (3 3 英尺)范围内与任何一个蓝牙设备进行沟通。 如何使用无线蓝牙耳机? 无线蓝牙耳机使您可以随心地与任何蓝牙设备连接,例如 摩托罗拉 V 6 0 0 蓝牙手机。 * 使用免提功能 * 使用耳机多功能键处理来电及拨打电话 * 利用声控拨号 注:HS820 产品为增加其功能性及兼容性,同时支持耳机及 免提蓝牙功能。请参阅用户手册,了解更多信息。 21 耳机图解 耳机 (正面) 22 耳机 (背面) 1. 多功能键――控制耳机多种功能 2. 充电接口――与充电器连接进行耳机充电 3. 挂钩――用于将耳机挂在耳朵上 4.耳机显示灯 LED ――显示耳机状态 5. 麦克风――传递声音 6. 听筒――播放通话 7. 音量控制键――控制听筒声音大小 使用方法 充电 何时充电 首次充电――在使用耳机前,请将随机电池充电 2 小时 重复充电――当从听筒听到 5 声快速警告音并每间隔 20 秒 重复一次时,表明您的耳机需要再次充电。 随着使用时间,电池功能下降并需要较长时间进行充电, 属于正常现象。同时,耳机通话时间越长,电池的待机时间 越短。 无线耳机充电电池必须谨慎丢放,再生利用。 与当地环保机构联络,妥善丢放。 警告:不要将电池放入火中,以免引起爆炸。 23 如何充电 操作步骤 1. 将摩托罗拉充电 器插入耳机中,耳 机朝上, 充电器插 头上的开锁钮向下。 2 . 将充电器插入电源中。在充电过程中,耳机显示灯亮 起,直至充电完毕。耳机在充电过程中无法使用。耳机大约 2 小时即可充足电。 3 . 当充电完毕后(显示灯熄灭后),拔断充电器电源,按 下充电器插头上的开锁钮,将充电器接头拔出。 注意:当您在车上时,您可以利用摩托罗拉原装车载充电 器进行充电。 24 电池在充满电量情况下提供约: * 通话时间:6 小时 * 待机时间:1 0 0 小时 耳机佩戴 佩戴耳机 包装中的耳机为右耳佩戴模式。 操作步骤 1.将耳机挂钩旋转 45 度 2. 将耳机挂钩挂在耳后 3. 将耳机机身靠近耳朵 4. 将麦克风对准嘴部 25 改变至左耳佩戴模式 操作步骤 1.将耳机挂钩向外旋转 90 度 2. 轻轻抬起并拉起耳机挂钩 顶部,与耳机上端按钮分离; 取下耳机挂钩。 3.旋转耳机 4.将耳机挂钩底部按在耳机下端的扣上,从下端按扣拉起并 将挂钩上端与耳机顶部扣紧。 5.为改变耳机声控大小方向,请参阅第 15 页“调整耳机音 量” 。 26 开 / 关耳机 开机 操作步骤 当耳机在关机状态下,同时按住多功能键及任意一个音量 键三秒钟左右,直至 LED 显示灯快速闪烁。 关机 操作步骤 当耳机在开机状态下,同时按住多功能键及任意一个音量 键三秒钟左右,直至 LED 显示灯快速闪烁。 27 耳机与手机配对 注意 :在使用耳机通话前, 耳机必须与手机配对。 “配对”是指在蓝牙设备之间建立联系,同时使手机存储 耳机独有识别 ID。当耳机与手机实现配对后,耳机自动与手 机连接。 配对 将耳机与手机放置在一起。 操作步骤 1 . 当耳机在关机状态下,按住多功能键三秒钟左右,直至 L E D 显示灯恒亮。 2.启用手机寻找设备功能。有关手机寻找设备功能,参见手 机使用手册。当手机检索完成后,手机显示找到的所有设备。 3.在设备列表中选择摩托罗拉 HS820,根据手机提示确认。 28 4 . 在手机确认过程中,输入密码“0 0 0 0 ”并确认匹配耳 机与手机。设备 I D 将存储在手机内存中。耳机显示灯将 快速闪烁显示耳机配对成功。 与其他设备配对 通过蓝牙技术,耳机可存储最多 8 个蓝牙设备的配对信 息。所有设备将按照配对次序先后被存储在耳机“配对设 备列表”中。当与超过 8 台设备进行配对操作时,最早 的配对设备将被从配对设备列表中清除。 已实现配对的 8 个设备都可与耳机启动连接。 耳机只能与最后一个配对设备实现自动启动连接。如果您 想启用配对设备列表中的其他设备,您必须利用该设备启 动连接。8 个设备中任何一个最近一次与耳机建立了连 接,接下来则该设备被默认为最后与耳机建立连接的设 备 。 29 调整耳机音量 增大或减小音量 增大听筒音量,请重复按上部音量控制键, 直到达到理想音量 减小听筒音量,请重复按下部音量控制键, 直到达到理想音量 音量控制方向改变 因左右耳佩戴不同,音量控制方向不同: 操作方法 关闭耳机电源,同时按下多功能键及需设置的音量增大方 向按键,直至显示灯闪烁 2 次,同时耳机电源开启。 通话 30 耳机同时支持免提及耳机功能。拨打电话功能取决于您的 手机的相应功能。 注意:有些手机并不支持列表中的所有功能。请参阅您的 手机使用指南。 您可以使用以下列表所有的免提通话功能: 设备状态 功能 手机 操作步骤 耳机 耳机操作 进入配对设备模式 开 关 按住多功能键直至 LED 显示灯恒亮起。 耳机将被其他蓝牙 设备搜索到。 声控拨号 待机 开 轻按一下多功能键, 说出名字,电话拨出 重拨电话 开机―声控 拨号开或关 开机- (待机) 长时间按住多功能键 31 设备状态 功能 结束通话 32 操作步骤 手机 耳机 耳机操作 开机-在通 话中 开机 轻按一下多功能键 说出名字,电话拨出 让一方通话等待 开机-通话中 开机 接听电话 开机-手机 铃响 开机 拒绝接听 开机-手机 铃响 开机 接听第二个来电 开机-通话中; 开机 第二个电话打入 长时间按住多功能键, 将第一个电话置于等待 中,接听来电 在两个通话中 转换 开机-通话中, 开机 第二个电话被置 于等待中 长时间按住多功能键 将通话转至耳机 开机-在通话中 开机 长时间按住多功能键 轻按一下多功能键 (电话接通) 长时间按住多功能键 轻按一下多功能键 (电话转接至耳机上) 注意 :如果连接非正常掉线 (例如,不在服务区), 耳 机将尝试重建连接。 耳机显示灯 LED 充电器插入时 耳机显示灯 开 关 状态 充电中 充电完毕 无充电设备接入时 耳机显示灯 关 开(无闪烁) 10 次快闪 以 3 秒间隔闪烁(0.1 秒亮,2.9 秒关) 状态 关机 配对模式中 配对成功 待机(未在通话中) 以 8 秒间隔闪动(2.0 秒亮,6.0 秒关) 连接中(通话中) 注意:当无线耳机与手机配对后,如果 5 分钟都未被使用, 蓝色闪烁 LED 显示灯关闭。按下耳机任意键,重置计时器, 蓝色闪烁显示灯恢复。 33 提示音 提示音 当按下音量控制键时发出一声高提示音 5 声快速高提示音,每 20 秒重复一次 无声音提示;通话质量差 连续 4 声提示音,由低到高 耳机状态 达到声音最高或最低 低电量 不在服务区 语音通话接通 (耳机模式), 可通话 (免提模式) 响铃 来电 1 声高提示音 配对成功确认 1 声低提示音 启动声控 2 声高 / 低提示音 声控未识别 1 声高提示音 结束通话 连续 4 声,由高到低 语音通话关闭 (耳机模式), 通话结束 (免提模式) 每 5 秒快速高低音(达到最高或最低音 无网络、无服务 量的提示音) 无提示音 开机、 关机 34 安全和性能 有關安全及有效使用的重要資訊。請於使用設備前閱讀。 用戶不能對設備進行任何更改。任何未經許可的更改都可 能導致有損用戶使用該設備的權利。參見 47CFR Sec.15. 21。 此設備符合聯邦通訊委員會(FCC)標準第 15 部分。此設備 運作過程中必須符合以下 2 個條件: (1)此設備不能産生任 何有害干擾,同時(2)此設備必須能夠接受可能干擾,包 括可能會導致非正常工作的干擾。參見 47CFR Sec.15.19 (3)。 電磁干擾與電磁相容 注:幾乎所有電子設備,如果不適當包裝、設計或電磁 相容配 置,都極易産生電磁干擾。 35 在某些場所中 爲避免電磁干擾或相容衝突,請按該場所提示要求,關閉 您的電子設備。醫院及健康機構使用的某些設備極易受到外 置射頻的影響。 在飛機上 在登機後,請按要求關閉您的電子設備。任何電子設備的 使用均需符合機艙機組人員規定。 醫療設備 助聽器 有些電子設備可能會對助聽器産生干擾。當遇到此類干擾 時,請與您的助聽器廠商取得聯繫選擇替代産品。 其他醫療設備 36 如果您使用任何其他私人醫療設備,請與設備廠商聯繫, 以確認它的抗射頻干擾性。您的私人醫生或許能幫助您瞭解 相關資訊。 加拿大行業協會聲明 設備在使用中必須符合以下 2 個條件:(1 )此設備不能 産生任何有害干擾,同時(2)此設備必須能夠接受干擾,包 括可能會導致非正常工作的干擾。參見 IC RSS 210 Sec. 5.11。 “IC”指設備取得認證號前,此設備的註冊號是基於 符合加拿大行業技術標準規格的聲明發放的。並不代表加拿 大行業協會認可該設備。參見 Ref IC Self - Making 6 (f) and RSP-100 Sec.4. 聯邦通訊委員會聲明 此設備經過測試,符合 B 級數位設備標準,符合聯邦通訊委 員會第 15 部分的規定。這些限制標準爲確保此設備在居住 地區使用防止有害干擾。此設備使用並放射無線電頻率,如 不按照標準正常安裝使用,可能會對無線電通訊造成有害干 擾。然而,無法保證採用何種安裝模式可以完全避免干 37 擾。如果該設備對無線電或電視接收造成有害干擾,導致 必須開啓或關閉該設備,用戶可以嘗試以下幾種方法避免 干擾: * 調整接收天線 * 將此設備遠離其他信號接收設備 * 將該設備與其他信號接收設備分置在不同電源上 * 與供應商取得聯繫,或向資深廣播電視技術人員諮詢 38 簡介 什麽是無線藍牙技術? 藍牙技術是指在無線的情況下、利用內建無線電收發設備進 行溝通;此內建無線電收發設備爲保證全球相容性,可接收 全球的無線電頻率。此款無線藍牙耳機可在約 10 米(33 英 尺)範圍內與任何一個藍牙設備進行溝通。 如何使用無線藍牙耳機? 無線藍牙耳機使您可以隨心地與任何藍牙設備連接,例如摩 托羅拉 V600 藍牙手機。 * 使用免提功能 * 使用耳機多功能鍵處理來電及撥打電話 * 利用聲控撥號 注:HS820 産品爲增加其功能性及相容性,同時支援耳機及 免提藍牙功能。請參閱用戶手冊,瞭解更多資訊。 39 耳機圖解 耳機 (正面) 耳機 (背面) 1. 多功能鍵――控制耳機多種功能 2. 充電介面――與充電器連接進行耳機充電 3. 掛鈎――用於將耳機掛在耳朵上 4.耳機顯示燈 LED ――顯示耳機狀態 5. 麥克風――傳遞聲音 6. 聽筒――播放通話 7. 音量控制鍵――控制聽筒聲音大小 40 使用方法 充電 何時充電 首次充電――在使用耳機前,請將隨機電池充電 2 小時 重復充電――當從聽筒聽到 5 聲快速警告音並每間隔 20 秒 重復一次時,表明您的耳機需要再次充電。 隨著使用時間,電池功能下降並需要較長時間進行充電, 屬於正常現象。同時,耳機通話時間越長,電池的待機時間 越短。 無線耳機充電電池必須謹慎丟放,再生利用。 與當地環保機構聯絡,妥善丟放。 警告:不要將電池放入火中,以免引起爆炸。 41 如何充電 操作步驟 1. 將摩托羅拉充電 器插入耳機中,耳 機朝上,充電器插 頭上的開鎖鈕向下。 2 . 將充電器插入電源中。在充電過程中,耳機顯示燈亮 起,直至充電完畢。耳機在充電過程中無法使用。耳機大 約 2 小時即可充足電。 3.當充電完畢後(顯示燈熄滅後) ,拔斷充電器電源,按下 充電器插頭上的開鎖鈕,將充電器接頭拔除。 注意:當您在車上時,您可以利用摩托羅拉原裝車載充電 器進行充電。 42 電池在充滿電量情況下提供約: * 通話時間:6 小時 * 待機時間:100 小時 耳機佩戴 佩戴耳機 包裝中的耳機爲右耳佩戴模式。 操作步驟 1.將耳機掛鈎旋轉 45 度 2. 將耳機掛鈎掛在耳後 3. 將耳機機身靠近耳朵 4. 將麥克風對準嘴部 43 改變至左耳佩戴模式 操作步驟 1.將耳機掛鈎向外旋轉 90 度 2. 輕輕擡起並拉起耳機掛鈎 頂部, 與耳機上端按鈕分離 ; 取下耳機掛鈎。 3.旋轉耳機 4.將耳機掛鈎底部按在耳機下端的扣上,從下端按扣拉起並 將掛鈎上端與耳機頂部扣緊。 5.爲改變耳機聲控大小方向,請參閱第 15 頁“調整耳機音 量” 。 44 開 / 關耳機 開機 操作步驟 當耳機在關機狀態下,同時按住多功能鍵任意一個音量 鍵三秒鐘左右, 直至 L E D 顯示燈快速閃爍。 關機 操作步驟 當耳機在開機狀態下,同時按住多功能鍵任意一個音量 鍵三秒鐘左右, 直 至 L E D 顯示燈快速閃爍。 45 耳機與手機配對 注意 :在使用耳機通話前, 耳機必須與手機配對。 “配對”是指在藍牙設備之間建立聯繫,同時使手機存儲 耳機獨有識別 ID。當耳機與手機實現配對後,耳機自動與手 機連接。 配對 將耳機與手機放 置 在一起。 操作步驟 1 . 當耳機在關機狀態下,按住多功能鍵三秒鐘左右, 直至 LED 顯示燈恒亮。 2.啓用手機尋找設備功能。有關手機尋找設備功能,參見手 機使用手冊。當手機檢索完成後,手機顯示找到的所有設備。 3.在設備列表中選擇摩托羅拉 HS820,根據手機提示確認。 46 4 . 在手機確認過程中,輸入密碼“0 0 0 0 ”並確認匹配耳 機與手機。設備 I D 將存儲在手機記憶體中。耳機顯示燈 將快速閃爍顯示耳機配對成功。 與其他設備配對 通過藍牙技術,耳機可存儲最多 8 個藍牙設備的配對資 訊。所有設備將按照配對次序先後被存儲在耳機“配對設備 列表”中。當與超過 8 台設備進行配對操作時,最早的配對 設備將被從配對設備列表中清除。 已實現配對的 8 個設備都可與耳機啓動連接。 耳機只能與最後一個配對設備實現自動啓動連接。如果您 想啓用配對設備列表中的其他設備,您必須利用該設備啓動 連接。8 個設備中任何一個最近一次與耳機建立了連接,接 下來則該設備被默認爲最後與耳機建立連接的設備。 47 調整耳機音量 增大或減小音量 增大聽筒音量,請重復按上部音量控制鍵, 直到達到理想音量 減小聽筒音量,請重復按下部音量控制鍵, 直到達到理想音量 音量控制方向改變 因左右耳佩戴不同,音量控制方向不同: 操作方法 關閉耳機電源,同時按下多功能鍵及需設 置的音量增大方 向按鍵, 直 至顯示燈閃爍 2 次,同時耳機電源開啓。 通話 48 耳機同時支援免提及耳機功能。撥打電話功能取決於您的手 機的相應功能。 注意:有些手機並不支援列表中的所有功能。請參閱您的 手機使用指南。 您可以使用以下列表所有的免提通話功能: 設備狀態 功能 手機 操作步驟 耳機 耳機操作 進入配對設備模式 開 關 按住多功能鍵直至 LED 顯示燈恒亮起。 耳機將被其他藍牙 設備搜索到。 聲控撥號 待機 開 輕按一下多功能鍵, 說出名字,電話撥出 重撥電話 開機―聲控 撥號開或關 開機-(待機) 長時間按住多功能鍵 49 設備狀態 操作步驟 功能 手機 耳機 耳機操作 結束通話 開機-在通 話中 開機 輕按一下多功能鍵 讓一方通話等待 開機-通話中 開機 接聽電話 開機-手機 鈴響 開機 拒絕接聽 開機-手機 鈴響 開機 接聽第二通來電 開機-通話中; 開機 第二通電話打入 長時間按住多功能鍵, 將第一通電話置於等待 中,接聽來電 在兩通來電中 轉換 開機-通話中, 第二通電話被置 於等待中 開機 長時間按住多功能鍵 將通話轉至耳機 開機-在通話中 開機 輕按一下多功能鍵 (電話轉接至耳機上) 長時間按住多功能鍵 輕按一下多功能鍵 (電話接通) 長時間按住多功能鍵 注意 :如果連接非正常掉線 (例如,不在服務區), 耳 機將嘗試重建連接。 50 耳機顯示燈 LED 充電器插入時 : 耳機顯示燈 開 關 狀態 充電中 充電完畢 無充電設備接入時 : 耳機顯示燈 狀態 關 關機 開(無閃爍) 配對模式中 10 次快閃 配對成功 以 3 秒間隔閃爍(0 . 1 秒亮,2 . 9 秒關) 待機 (未在通話中) 以 8 秒間隔閃動(2 . 0 秒亮,6 . 0 秒關) 連接中 ( 通 話 中 ) 注意:當無線耳機與手機配對後,如果 5 分鐘都未被使 用,藍色閃爍 LED 顯示燈關閉。按下耳機任意鍵,重置計時 器,藍色閃爍顯示燈恢復。 51 提示音 提示音 當按下音量控制鍵時發出一聲高提示音 5 聲快速高提示音,每 20 秒重復一次 無聲音提示;通話質量差 連續 4 聲提示音,由低到高 耳機狀態 達到聲音最高或最低 低電量 不在服務區 語音通話接通 (耳機模式), 可 通話 ( 免 提 模 式 ) 響鈴 來電 1 聲高提示音 配對成功確認 1 聲低提示音 啓動聲控 2 聲高 / 低提示音 聲控未識別 1 聲高提示音 結束通話 連續 4 聲,由高到低 語音通話關閉 (耳機模式), 通 話結束 (免提模式) 每 5 秒快速高低音(達到最高或最低音 無網路、無服務 量的提示音) 無提示音 開機、 關機 52